Detailed Configuration Guide
This guide explains the component details, system requirements, and detailed setup procedures required when installing AIBooster in various environments.
Component Details
Agent
Agent containers are assumed to be running continuously on all nodes to be observed. These containers perform fixed-point observation of the node's hardware and system status, collecting performance metrics for programs running on them.
They provide the following features, with some containers requiring privileged mode operation (container startup with administrator privileges):
- Node Exporter: Collects CPU and I/O related metrics
- DCGM Exporter: Collects GPU metrics
- PCM Exporter: Collects Intel CPU/Memory Subsystem specific metrics
- eBPF Profiler: Collects program execution status
Server
Server containers are assumed to run on a single Linux node connected to the same network as the compute nodes where Agents are running. They can be placed on a dedicated management node or co-located with one of the compute nodes with Agent installed.
The containers included in Server are:
- ClickHouse: Stores data
- Grafana: Visualization functionality
- Nginx: Reverse proxy
Additionally, the following ports must be open on the node where Server containers run:
| Port | Expected Access Source | Purpose |
|---|---|---|
| 3000 | User's PC | Access to performance observation dashboard |
| 9000 | Nodes running Agent | Metric collection |
Configuration Pattern Selection
| Configuration | Features | Recommended Use |
|---|---|---|
| Single Node | Complete on 1 machine | Verification, learning, small-scale PoC |
| Multi Node | Distributed across multiple machines | Production use, large-scale clusters |
Single Node Configuration
A configuration where both AIBooster Server and Agent run on a single machine.
Pattern 1: Minimal Configuration for Verification
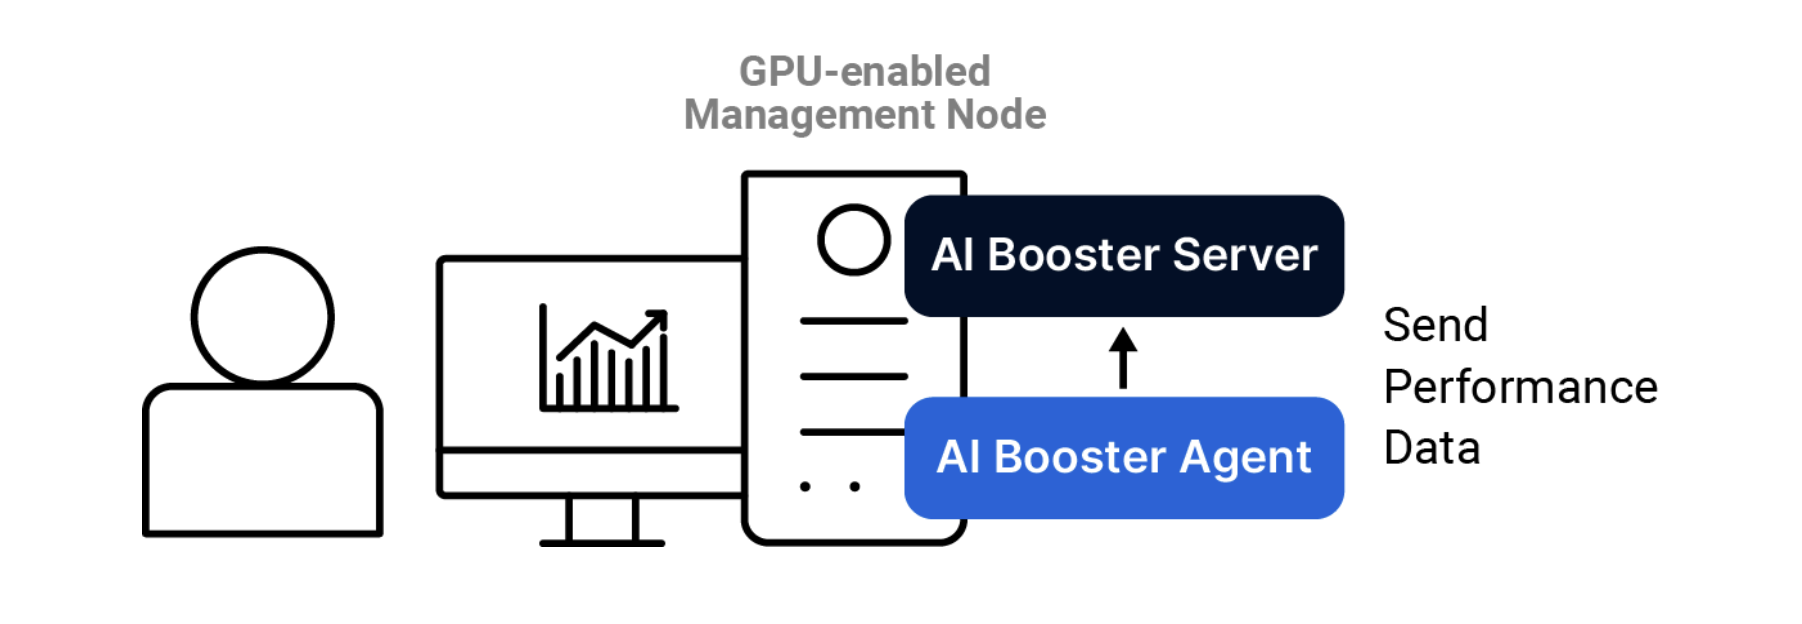
Install both AIBooster Server and AIBooster Agent on a single GPU-equipped workstation/server. Connect a monitor and open the dashboard directly to view performance information. This is the shortest route for "just wanting to try it out" on offline verification or benchmark machines. No network configuration is required.
Pattern 2: Multi-User Configuration
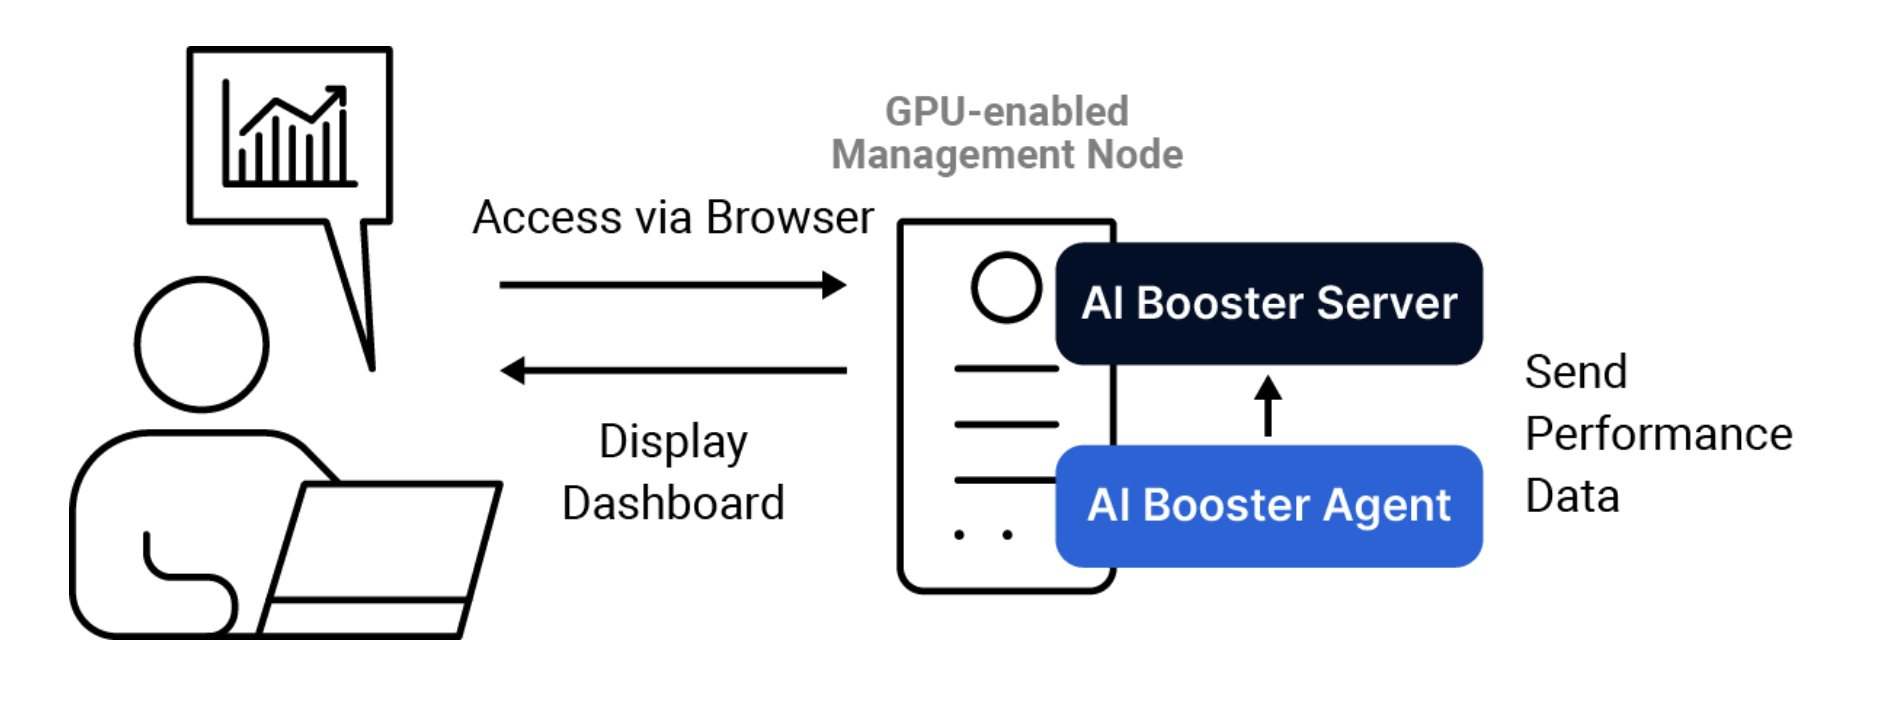
Install both AIBooster Server and AIBooster Agent on a single GPU-equipped workstation/server. Users view the dashboard provided by the server through a browser from their personal PCs via TCP port 3000. Ideal for small-scale PoCs where multiple people want to view the dashboard.
Multi-Node Configuration
A production-oriented configuration where AIBooster Server and Agents run distributed across multiple machines.
Pattern 1: Management Node Separation (Recommended)
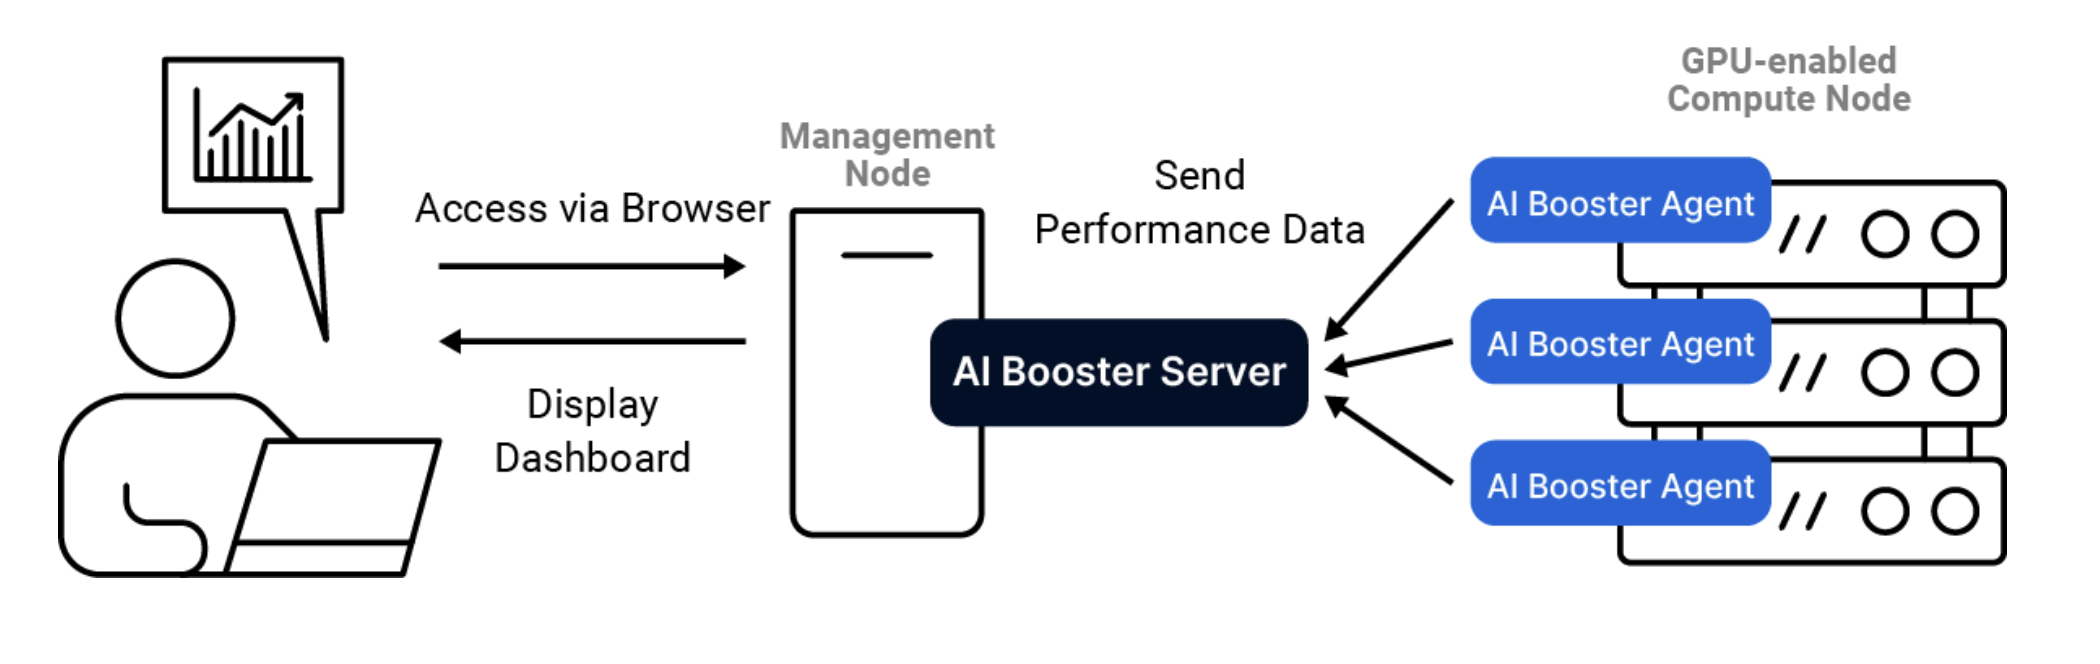
Install AIBooster Server on the management node and AIBooster Agent on each GPU compute node. Users view the dashboard provided by the management node through a browser from their personal PCs via TCP port 3000. This is the recommended configuration for most GPU cluster server systems.
Pattern 2: Compute Node Co-location

When no specific management node exists, select one GPU-equipped node and install both AIBooster Server and its dedicated AIBooster Agent on it. Install only Agent on the remaining GPU-equipped nodes. Users view the dashboard provided by the GPU-equipped node with AIBooster Server installed through a browser from their personal PCs via TCP port 3000.
System Requirements
Ensure all nodes to be set up meet the following requirements:
OS/Software Requirements
- Ubuntu (>=22.04)
- Linux Kernel (>=5.15)
Additionally, if the following software is not installed, setup will be performed automatically:
- Docker (>=28.0)
- NVIDIA Container Toolkit (>=1.17)
Network/SSH/Permission Requirements
SSH Connection Requirements
- Network access via SSH must be available
- SSH port on each node must be open
User/Permission Requirements
- Must be able to log in with the same username on all nodes
- Login user must have privileges to escalate to administrator (sudo privileges)
- sudo password must be set to the same value on all nodes
The installer SSH connects to all nodes with the current username, so the same username and sudo password are required on all nodes.
Setup Procedures
1. Running the Installer
Copy and execute the following command in your terminal:
curl -sLO assets.aibooster.fixstars.com/faibup.sh && sh faibup.sh
Setup is completed by answering configuration questions in the terminal.
2-a. Single Node Setup
The installer will ask the following questions:
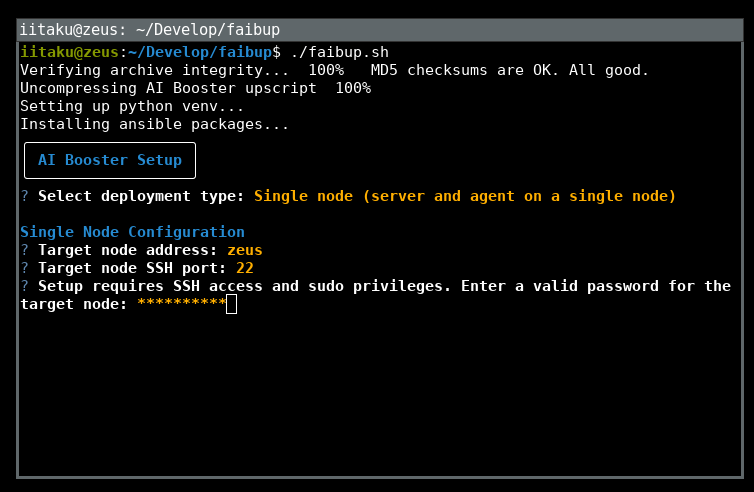
- Target node address: Enter the IP address or resolvable hostname of the target node
- Target node SSH port: Enter the SSH port of the target node
2-b. Multi-Node Setup
The installer will ask the following questions in order:
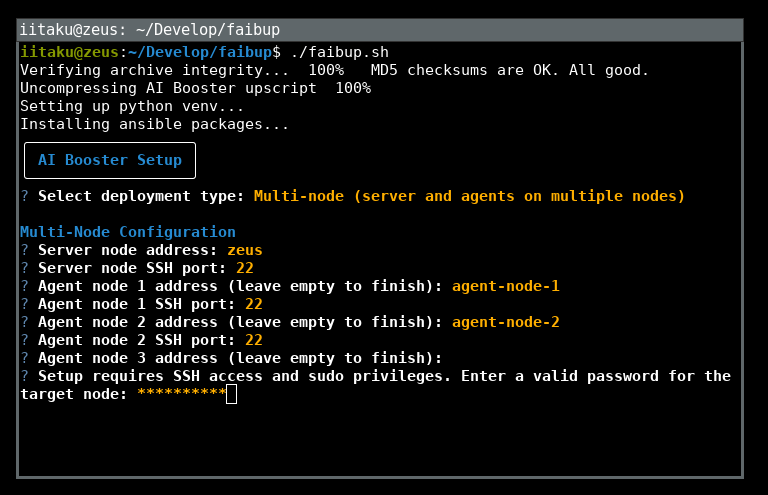
Note that steps 3-4 will be repeated.
-
Server node address: Enter the IP address or resolvable hostname of the node where AIBooster Server will run
-
Server node SSH port: Enter the SSH port of the node where AIBooster Server will run
-
Agent node address: Enter the address of the compute node where you want to install AIBooster Agent
-
Agent node SSH port: Enter the SSH port of the Agent node
-
After entering all nodes, press Enter on an empty line to confirm
3. Entering Authentication Credentials
During installation, you will need to enter the following information for SSH connection and sudo privilege acquisition:
- SSH password (required for sudo privilege escalation even if public key authentication is configured)
- sudo password (must be set to the same value on all nodes)
4. Installation Complete
When "AIBooster setup completed successfully!" is displayed, the setup has completed normally.
Open the URL shown at the end in your browser and confirm that the dashboard is displayed. A URL for accessing AIBooster documentation is also displayed.
Dashboard Initial Setup
Grafana First Login
AIBooster uses Grafana for performance data visualization. When accessing the dashboard from a browser, the following screen is displayed for the first time:
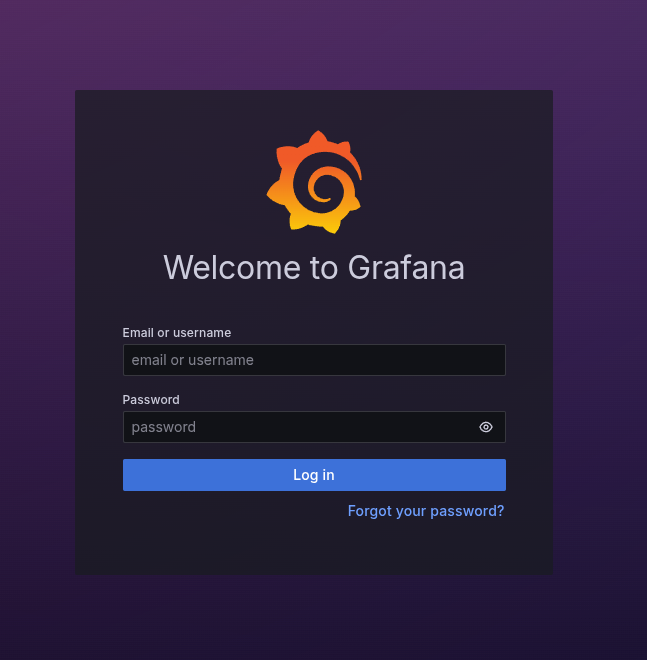
Password Setup
- Enter
adminas both username and initial password - You will be prompted to change the administrator password, enter any password
Setup Completion Confirmation
When the following screen is displayed, the dashboard initial setup is complete: